Saturday 29 December 2018

Mmmmmm - Leather.....

..... Ahem - sorry.

I'm kind of moving away from the "barn-found '50s racer" theme the car's had up to now & moving on to a more "classic spots car" sort of theme. Central to this plan is the back of an old sofa (bear with me), is was cream & it wore out through being jumped on by kiddies, the back however was pristine cream leather - see where this is heading now?

The leather has been out in the garage for a year, just to make sure it doesn't crack or fall apart in the cold, so with my marriage crumbling around me (looks like I'll be needing a new garage - preferably with a house attached) now was the time to avoid the family & go to the garage!


Driver's door - no leather, black plastic handle
At first build I'd used plain black Renault Megane door handles - they'd have to go & guess what - the Clio had handles with the same foot-print, but shiny chrome levers & a pair (Brand new in the Renault packet) were £8 delivered, so with the old sofa back & a sharp knife I set to work:-


Passenger door, leather trim, chrome door handle, aluminium bolt collars

I was quite pleased with the result, & a day or two later did the driver's door to match, only noticing some time later that I'd glued it on with the seam facing the opposite way DOH!

That'll have to wait now to see if there's enough left to replace it when everything else is done.

There's a bit of a dash refresh going on too. the dash will also be covered in ex-cow, but I had some messing about to do first. It is possible to get the dash out of the car, but it's not an easy thing, so as it would be getting re-covered, I thought cutting the dash into three seemed like a good idea.

I made the new centre section for the clocks & warning lights, clamped it to the dash & drilled the mounting holes (to ensure everything aligns when it's three pieces). Having got the shape & made quite certain that the clocks & lights fitted in the holes, I peeled off the plastic coating & gave the aluminium a nice brushed finish - that doesn't show up in the picture on the right - with a scotchbrite wheel.

Then I cut the centre out of the dash (eek). There was no risk in doing this as the two parts of the old dash each bolt to enough points to keep it in the right place & furthermore, it was all drilled to match the adjoining piece before it was cut.

But it still felt like a brave move to take the aviation snips to the dashboard.

So with a brave pill swallowed I separated it & rounded off the edges to clear the clocks & make it all neat.

That's torn it


The three parts were offered up & the bolts inserted (all of them, before any wee tightened), it was a bit of a struggle as the warning lights are still on the main dash loom so needed to be un-plugged one at a time fitted & re-plugged - I'll be getting a multi-plug for this to make it easier.

but after donating only a relatively small amount of knuckle skin, it was all in & sorted.


I can't help thinking it looks a bit garish at the moment, but I'm hoping the new dash covering will tone it down a bit. I may need to reduce the amount of aluminium around the clocks by half, but I'm in no rush


Then there was the problem of the Sat-Nav. I broke the TomTom XXL trying to modify it & as the maps were so old that as I got near the coast the voice said "here be dragons" I invested in a new(ish) TomTom 5100 which comes with a cradle dock which is quite neat. I thought "I'll get one for each car" - 'til I saw the price, £35!!

The SatNav doesn't need the cradle, it'll work just fine with a micro USB plugged in, so I started wondering about cutting the RAM mount I had for the XXL to fit, Or just having a clamp arrangement. Fast forward a couple of days & while browsing the interweb for ideas I noticed a side ad for Halford's sale & an official TomTom air-vent mount for a 5100 for £10 - which is much more like it. I ordered one on "Click & collect" from Farnborough as it was out of stock in Guildford. The following day I trundled the 12 miles to Farnborough & requested my shiny new mount. It was stuffed into a box which had clearly seen better days. I took it out to the car park & tested it - nothing. I stuffed it back whence it came & marched back into the shop. The nice young lady apologised & said they had another in stock, then took 20 minutes to fail to find it. I helpfully suggested that maybe it'd been given to the person who returned the one I had. While this was going on, no fewer that three assistants tried to offer me just the vent clip, without the dock claiming it was the same thing. Oh how I laughed

She called another branch who said that they had one - but it was broken too, she then called Bracknell who even though the computer said they had one, they could find neither hide nor hair of it. I was refunded my £10.

Sigh

On the way home I was thinking that I should've just kept it as a dumb mount & plugged in a microUSB, so on arrival I fired up the trusty laptop & joy of joys there was one showing in Godalming Halfords. I placed the order & set off.

I was greeted by another nice young lady who looked at the order & found me the vent clip without the dock. With sinking heart I pointed out that this was not the thing I'd ordered & she scurried off out the back of the shop - & returned triumphant!! It was the clip with the dock, the packaging was sealed & back in the car park it worked!! So my "bargain" had saved me £25, but cost me four hours of my life, two gallons of fuel & 90p in car park fees.

Sigh

So I had a mount that worked & was wondering how to butcher it to fit. It works by having two rubberized prongs to fit over a vent grille bar & a large rotating disc which pulls them together, thus clamping the grille bar. I unscrewed it all the way, the prongs fell off & inside was an M5 thread that does the pulling.
 I put some M5 studding in that, flattened off the face it clamps up to, drilled a hole in the dash, penny washer & nut on the other side & Bob was my uncle.


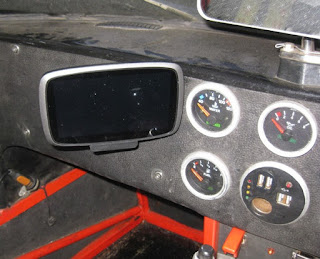
I think it looks quite neat.


This is the rear view, again, it looks quite "OEM" (ish).
 

Saturday 1 December 2018

Winter Changes

Not a great deal has happened since the last post, none of it photo-worthy, but progress has been made.

I took down the near side pod, took the over-wheel section of the exhaust off & re-shaped it further forward & upward, so it now clears the wheel by a much larger margin & the car should be tyre-smoke-free on right hand bends with a passenger (fingers crossed). This of course involved WELDING - a thing I'm not very good at, but after blowing a lot of holes in the pipe, I bought an auto-darkening welding helmet & was then able to heal-over all the holes. Not pretty, but job done. As the pipe is now further forward & further out, I had to re-cut the trailing edge of the pod to fit round it & noticed the upper face was all cracked where it bolts on, so made up an aluminium plate & fitter the anchor nut to that & pop-riveted it on so the area's all nice & reinforced.

I've also replaced the 15 year old cam-belt. It's not as bad as it seems as it was fitted to the engine by Fords in 2004, then sat waiting for me to buy it until 2012 so it's not seen a lot of use, just a lot of years.

It all went OK until I tried to start the engine & it just turned over & over & I realised I must've got the cam timing out by one tooth (DOH!). This morning I took out & cleaned all the plugs, left 3 of them loose in the car so I could turn it over, locked the cams & CAREFULLY rocked the crank back & forth until I was happy No.1 piston was at Top Dead Centre (TDC), then CAREFULLY threaded the belt round the pulleys again. This time it fired straight away, so I'm happy all's well.

Like I said, nothing very interesting or exciting, but it needed doing.

Saturday 3 November 2018

Mind The Gap

The filler cap is finished, it wasn't without its tribulations. When I left it, it was working but the boot lid was sitting too high, so first job this morning, I cut the cake tin / splash bowl down so there was an even gap.

Obviously where there's a touch, I cut that back - then it touched somewhere else, so that got trimmed. Eventually there was an even 2mm gap all round with the boot lid in its' proper place. Then I fitted the filler cap back on & found the hinge pin hadn't been riveted over & was creeping out.
 It got replaced with a titanium bolt.

This it was the same process again, mark where the boot lid touched the filler, cut it back, re-try. Over a couple of hours I got the gap pretty even & the cap works nicely.


It's one of those details that needs a lot of thinking, then a lot of work & you'll know if you've got it right because no-one will notice it because it looks natural on the car.


I cleaned up the edges & applied a coat of the yellow nail varnish I keep for this sort of thing & stuck some rubber edging round the splash bowl..


So the cap fits, it works & all that's left to do is raise the boot rack to clear the cap when it's open.
 

Friday 2 November 2018

The Cap Fits!

This afternoon I've been fitting the new fuel cap to the Fury. The old one came off easy enough & the new one seemed happy enough, so I cut the cake tin / splash bowl to suit & tentatively fitted the boot lid, the existing hole was way too small & it looked as if I'd need to cut a slot a long way forward to allow the cap to open, so I began tentatively, removing small amounts of GRP with a tungsten carbide file. Then (inevitably) I got bored & went at it with a coarse burr (like a cylindrical-file-on-a-stick) mounted in a drill gun......set on "fast".


This may sound like the prelude to a tale of woe, but I was not failed by my aircraft fitting skills & I must say I'm rather pleased with the result.


There's more work to do yet. I need to even up the gaps & the boot lid isn't sitting down properly yet, but height-wise it's pretty much exactly where I wanted it


And - astonishingly - it opens! (that's a locking cap inside the lid).
Again, there's a little more cutting & filing to do to make it work "nicely", but it is going to be extremely cool


The new splash bowl is only just big enough & is fouling the boot lid stiffeners a little, but again that's just fettling, once I've got the boot lid to sit down properly.

Once it's all done & working I need to shorted the boot rack stays a bit as the lid just fouls as it opens, so the rack needs to be lifted a little.

Monday 29 October 2018

Flipin' Cap

Have I told you about the flip cap? Have I? Have I?

When I built the car I wanted a lot of aeroplane influence, so it got an aero flush filler cap. Things move on & the car now has much more of a '50s vibe & what with the boot lid being cut & submerging the filler, it was now looking a little - odd.

So the new plan was a flip cap. I'd had one on the first car I built, so it sort of harks back to that.

Mounting plate rough cut
I bought the cap a month or so ago, but at 3/4 kg, it was obviously FAR too heavy, so the lock ring was ditched entirely & the neck was turned down to the max (or indeed min) & this resulted in a mass reduction of 1/4kg or 33%. So it's still a heavy item then.

I then needed a new way to mount it as I'd deleted the lock ring, so drew up a plate which would bolt to the underside, & would be bolted down through the new cake tin (more to come on that one) to the existing alloy fame structure in the boot, but the top of the cap should be about flush(ish) with the surface.
Mounting plate finish cut

That was the plan anyway.


So the mounting plate got bandsawed out of a 5mm plate I had in the garage, hand filed to smooth the periphery, drilled & countersunk for the cap mounting bolts & then drilled again for lightness, then polished. Not shiny polished, scotchbright polished to match the cap.


Polished - ish


Bolting it down needed bolts, so I popped round to my local nut & bolt emporium Margnor in Jacobswell & purchased 5 off M5 x 20 csk bolts for the princely sum of 30p (two of which are spares) & attached the plate to the underside of the cap.

Then realised I'd polished the wrong side.

Twenty minutes later & with both sides now polished, I bolted the mounting plate onto the cap & I saw that it was good.


The next job will be to cut the new cake tin to fit the filler cap, then remove the aero cap & drill the support structure to accept the new cap / mounting plate / cake tin assembly & enlarge the hole in the boot lid a little to allow the flip cap to - flip.

After that I may need to modify the boot rack a little if there's a clash, but I'll deal with that as & when .....


Friday 26 October 2018

Roger

I seem to have caused some confusion with my last post. The radio is for talking car to car, useful if someone is lost or has a car problem.

Today I finished off (ish) the system. Up until now the radio was powered by a 12v socket on the roll bar, next to that was a twin USB socket driving two cameras. It worked fine, but the addition of the iPod transmitter & on-going problems with the GoPro wifi widgets meant I needed had an excuse for more sockets. Even more sockets)

All this stuff can be run off batteries, but that means charging seven items to have it all working & on the road trip, having seven things plugged in overnight just doesn't work.

So, to work. I removed the 12v & USB sockets from the roll bar & replaced them with the shiny new matching ones, These will drive two GoPros & two wifi widgets. I cut a piece of aluminium to fit between the seat & the trans tunnel, attached by the existing tunnel top bolts, into this fit the old 12v & USB sockets, the 12v powers the radio, one of the USBs powers the iPod / mobile phone lead, the other powers the FM transmitter so I can hear the iPod over the radio.

How many power sockets has the Fury got now? Well there's three 12v, two on the dash, one on the tunnel & there's (ahem) nine USB ports. three on the dash, four on the roll bar & two on the tunnel.

At the moment the tunnel sockets draw power from the back of the roll bar sockets (the dangly red wire in the picture), but when the car is in dry dock for winter mods I'll take a line from the wiring loom inside the tunnel, so that red wire won't be on show.
 

Tuesday 23 October 2018

Head Set

An overhead conversation on the Cotswolds run got me thinking, the result is seldom simple once I start thinking. On club runs in the Fury I've used the headset that came with the two way radio & I bought a "better" one with a "head clamp" a boom mic & separate transmit switch - which worked OK, but the sound quality was pants & I struggled to understand what was being said.

Back to that conversation & one of the mechanical wizards was setting up the radio for an IT professional (yes, I thought that was odd too) & he happened to mention that the radio could be set on FM & would switch to transmit / receive if there was something happening. This meant if you had an iPod transmitter (Ebay £3 gadget to play the iPod over the car radio if your car's as old as my tintop is - it has a cassette player - remember them?) then the radio would send iPod to the headset & interrupt when there was chatter going on.


IMGP9683.JPG
Wiring for M/C helmet headset
( I MUST apologise for the table cloth - my wife's choice, I HATE it):-
So I set this up with bits & pieces I already had for the run last weekend & it worked - even though the sound quality was pants.

I've now taken delivery of a pair of folding Peltor ear defenders (yellow naturally), a motorcycle head-set kit for a crash hat & shortly there will be more goodies through the letter box.


I stuck it into the ear defenders & tyrapped the wiring to them. the kit has connectors for the helmet part & the talk-switch, so I ran that bit of the wiring round the car
Defenders Folded

Defenders Deployed
The sound quality is much much better as is the available volume. there was a minor hitch, the plug that goes into the radio was a little too wide :roll: but my good friend "Stanley Knife" helped out there.

The bits in the post are a new iPod transmitter which plugs into the headphone jack rather than the iPod dock like the one I have, so I can have the iPod plugged in & charging while it's transmitting & another FOUR usb sockets to power all the stuff that now needs amps (I may need a larger alternator).

I'm now wondering if I can break into the TomTom & fit a headphone jack to that & so have radio, music & TomTom all straight into the defenders.

Friday 12 October 2018

Winter Drawers On


So far October’s been quite a busy month for the Fury, first of all there was the annual Car Limits Day at North Weald. A couple of days later I took it to the Cotswolds with the Rogue Runners – well, most of them, Brian wasn't feeling sufficiently chipper.Then I went to Hickstead to do a course on driving MEWPs (Mobile Elevated Working Platforms apparently), but through all this motoring a few things have been apparent, firstly the rear wheels move further up into the arches with the new shorter shocks , this allows the tyre to rub on the exhaust at full bump with two people in the car, the next is the bizarre "Mexican moustache" it keeps growing around the rear number plate & the other is an occasional smell of petrol.
 
Mexican moustache
When I got home from work today, I looked at raising the exhaust, but that’s a winter upgrade job & the car's not off the road yet, so I turned my attention to the fuel system. I turned it on & after a few minutes there was no smell & no drippage. So the pipes & hoses weren't leaking.
 
When I put the fuel tank access door in the boot floor I ran a vent hose to a position behind the rear fog lights, I wondered if the smell of fuel was coming from there, certainly there was a waft on opening the boot as the negative pressure pulled fumes through this vent pipe.
 
I replaced the hose I’d used with a small bore fuel hose, fitted a non-return valve allowing air into the tank but not out & cunningly (I thought) moved the hose exit (actually the intake) such that it sits in the hidden area beside the off side rear fog light inside the recess for the number plate & is therefore OUTSIDE the car. Hopefully this will fix the smell.
 
The moustache is more confusing, whatever it is appears to come from the top of the rear fogs & run down the rear panel. It appears to be granular, so I'm wondering if it's tyre smoke from the exhaust rub, but why just stick around the number plate? There's obviously something running down the outside of the car, could the petrol fumes get from the inside of the boot into the number plate recess in sufficient quantity to stick tiny bits of rubber to the car? I will find out.

Saturday 6 October 2018

North Weald Again

 It's raining today - in marked contrast to yesterday where after a foggy start it became almost uncomfortably warm by mid afternoon.

I know this because I was out in it all day. It was the annual SKCC visit to North Weald to meet up with the chaps at "Car Limits" & thrash our cars around some disused RAF concrete.

This year I would be taking my son Callum, so I needed to go the south way round the M25 where there was fog in abundance, so the first of many firsts today for the Fury - the first time the rear fogs & the screen heater had been on together. I arrived at Callum's to be handed a coffee & a bacon roll by his lovely wife (anyone who hands me a coffee & a bacon roll qualifies for the title "lovely"), after which we set off into the murk. Under the Thames & into Essex the fog was if anything, worse. The nearside rear tyre still touches the exhaust when two-up & turning right - I know this because I looked in the mirror on the fast right hander at the M25 - M11 junction & saw the trail of tyre smoke we were leaving. But it wasn't too long before we rolled onto the airfield, past the Hurricane-on-a-stick & lined the Fury up with the other cars before signing on & having the Driver's briefing.

I was a little nervous about the noise test, as the Fury can be quite loud & at Castle Coombe it just squeaked past the 99db limit, today the limit was 105db, but there were no problems & we followed the instructor to the far end of the Car Limits area & along the long straight, then left along the line of an imaginary wall (to be avoided when doing this exercise for real). I did the first run to give Callum an idea of how fast the fury would corner, then pulled over & we swapped seats. Callum has only ever driven modern front-wheel-drive cars, so the Fury with un-assisted steering & brakes came as a bit of a shock, but we rolled round to the start line & waited our turn.

I was expecting to have to goad Callum into going faster - not a bit of it - we set off towards the corner as if the hounds of hell were on our tail, to the extent that as the corner raced towards us, I was thinking "we're not getting round this" - and we didn't. The back of the car caught up & overtook the front in a long sliding pirouette, the tyres scrubbed off about 75mph & we came to rest in a cloud of our own smoke laughing hysterically.

This was excellent, I'd been concerned that he wouldn't want to push too hard in my car, but I could see that wasn't going to be a problem. So onto the next run, a little lest speed & we were round successfully. I drove the next & was clocked at about 60ish mph at the corner, then Callum did another couple. The first one went well, high 50s at the bend, the back of the car started to drift, he steered in & caught it. It wasn't necessarily pretty, but it was a success. The run after than raised the speed a little more, again the car stated to drift, again he caught it, but wasn't expecting the snap back the other way & again we pirouetted to a smoky stop.

The next few runs saw us both raise our speeds until we were both in the mid 60s, which to be fair is as fast as the Fury has ever done it. After lunch a track was set up to replicate that used by the MSA for actual time-trial events & if Callum thought he had the measure of the car now, he was about to be proved wrong. The track started with a chicane, then a long straight, brake hard for a circle, then back along the straight & the same left we'd been practicing all morning, through a tarmac tightening right - left - right, off down the concrete, round a single cone & back to stop  between two cones.

Again I did the first run as I knew the layout. Off the line, into second, through the chicane, up to 5-6k RPM, into third, into forth doing maybe 80, hard on the brakes, drop straight into second, round (countering understeer & then oversteer) then back. Great fun. Calum's turn - off the line, into second, into third, round the chicane & accelerate ish as we were in too high a gear, at the end of the straight brake too soft & too late, brake harder & understeer across the circle, then try to get the car going again in forth, change to third, change to second...... OK, I should've explained what I was doing as we went round the first time - my mistake.

I tried to explain in a ham-fisted way about synchromesh & at the end of the straight, as we're slowing down put the gearstick towards second & wait for the gear to drop in, take the corner & accelerate round the circle in the right gear for the job - which he would've - but concentrated on the gearstick & forgot to brake, so we slid across the circle again, but picked up much quicker.

On the Third attempt & it all came together, we were in the right place, in the right gear, at the right speed, more or less all the way round the bit that had been troublesome, then going round the single cone at the end caught him out & resulted in the longest slide I've ever known ☺.

Me being instructed at
At this stage Callum decided to take some pictures of me driving round. I was waiting at the start line when one of the instructors just jumped in & said "off you go then". So whether I liked it or not I was given instruction on how it should be done. Jees, that car can fly! "faster", "faster", "brake now - harder - HARDER", "second gear - accelerate - HARDER" Hard on the brakes .... NOW!", "part throttle .... part throttle .... FLOOR IT!" It's amazing what abuse the Fury will take & keep going in the right direction.

Tyre smoke from the left rear tyre touching the exhaust
So what did I learn? I'm not sure, it was all a bit of a blur! I learnt I can rely on the Fury more than I though I could, that it will change direction like lightning if you drive it right & that the brakes are much better than I thought possible. The instructor guy seemed impressed too, he'd said right from the start that he'd always liked the Fury, when he got out he was talking about getting on to Fury Sports Cars & building one!

Callum drives, I grin


But back to Callum, the last run of the day & Callum was determined to get a "clear round". I got him to keep the car in gear for longer so we were faster & the trip round the circle worked well again, we accelerated hard up the straight - & span on the left-hander at the end. He was gutted - but for someone with little driving experience & certainly no experience at all of driving like this, he gained a good mastery of all the track's elements - just not all at the same time. I was impressed, a couple of goes with the instructor would've seen him getting really good times - better than mine & I couldn't have that, unfortunately the day was just a little too short - next year maybe.

Sunday 30 September 2018

Blackbushe Loop

On this trip we were joined by the abominable snowman
After my "Tour of Kent" last week was a bit of a let-down, this week's "Blackbushe Blatt" seemed to be going the same way, firstly, I woke up thinking "it looks quite light out there - strange" then realised the alarm hadn't gone off & it was already past the time I'd planned to leave. The when I got outside the garage door had been open all night, then the throttle started sticking on the A331.

I just got to the departure point with enough time to open the bonnet & see the return spring on the pedal was broken - not too big an issue as long as I was careful, there are at least another 6 springs closing the taps.


The air was cold, but warming rapidly as the sun came up, there was NO traffic, we didn't get stuck behind a single car in 65 miles, there were no speed humps. The route (courtesy of David T) was superb. David is fond of the birds & has been known to pick one up on a blatt - this time he nearly picked up a whole flock of pheasants.

After a while we stopped in a lay-by with a pleasant view & passed the time of day (had a wee) before heading off to the final destination.


Which was "White Lion Antiques" an ex-inn where they have car meets once a month & collect money for charity. This being late in the year & dry the place was packed - both fields full of interesting cars (and a few Porsches & BMWs). So here are the pictures I took:-


This is us, having just occupied some of the last available places in the second field, we walked down to the antiques shop / inn only to find they'd RUN OUT of bacon & buns! Disaster!

They did later come up with more sausages & buns so we were not left hungry & the hot chocolate was selling like hot cakes.


Pretty model A cabrio, one of two standard Model As


I'm guessing this guy has no trouble getting out of junctions.

The attention to detail was good - the German "jerry cans" were better than the allied ones, so the allies would pick up the German ones where they could. this Jeep has a German one behind the front wing, painted in German camouflage - nice.


Good to see a Morgan 3 wheeler without sharks teeth & mock RAF roundels


Equally, a Cobra - not blue with white stripes & not clean.


Good show that man!


Interesting cars should have names - not necessarily THIS large.


Now that's got character!


A row of Caterhams all looking exactly the same. Not sure if this was before or after they polished them (a speck of dirt will affect the re-sale value doncha-know).

After a while they all processed off in a sensible manner so as not to get any insect's ingredients smeared on them.


Mmmmmm MkI Escort RS2000 - probably the most expensive car in the field, seen here just before it got given some beans as it pulled out on the main road.


More character, the banded wheels, checkered grill & pillar mounted spotlight suggest there's more to this old MG than the words "barn find" might suggest.


No, I've no idea what it was either, other than it was Italian, prepped for racing, had Campag wheels .........


....... and a V8.


That my friend is styling

Yes, I know it's horribly slow, won't handle & will use more fuel than a super-tanker.
I KNOW that given half a chance will rust away in a week & desperately NEEDS an engine in the front, but will you just LOOK at it!


And speaking of which, I've seen this before & the detailing is fantastic. It's actually in perfect condition, all the rust, all the staining, even the chrome trim & the riveted patches on the body are PAINTED on. The fact that it'll run a 1/4 mile in 11seconds is a bonus.


I still cant make portrait orientated photos appear the right way on here, so you'll have to turn the screen round to see the engine bay of the Willys pick-up above.

Yes, Willys, as in "Willys Overland" the bunch that made that Jeep, then after the war, changed the Company name to "Jeep" presumably to stop the sniggering that driving a Willys caused.


Like I said all the dirt, even the smudging round the painted on "repair" at the bottom of the door is painted on.


I do like a big Healy, black over red for preference, but old English white is good too.


Hot rods are increasingly in the mainstream of car shows now, here's a couple of Ford '32 "Hi-Boys" (it's a description, not a greeting).....


What bad luck to have all eight mudguards fall off on the way to the show ... both front number plates too. Honestly, there's no pride in workmanship these days.


.....& a couple of Model As to compare & contrast with the standard one at the top.


Before the F1, road-going McLarens looked like this......


Stunning isn't it? - maybe lose the Capri tail lights? But a very good looking car.


The other standard Model A, a five-window with a "dicky seat" if you're English, a "rumble seat" if you're American.

An in-line four of course as the flathead V8 appeared the following year with the Model B

(sorry - geek-mode off)


Ascari parked next to the McLaren, the front's almost as attractive ........


The back erm -  less so.

I've left this photo small for those of a nervous disposition.


The boys are back in town ....

The green one is an early car (says "Consul" on the bonnet, the grey one is an "airflow" car, says "Cortina".

Both owners have had the good taste to not paint them white with a green stripe.


Daimler SP250 (was called the "Dart" until Dodge sued them) a car so ugly it actually comes back to attractive from the other direction.

Also the first GRP bodied production car unless someone knows different.


An actual '50s kit car, a Turner is it?

Another arrived as I was leaving, but I'd put the camera away by then.


Someone let a damn BMW in.


Fortunately there was a Riley (RM?) there for balance though.

I always fancied one of these with proper modern suspension, brakes engine etc.


How many of you have just said "I / my Dad / Uncle had one of those"?


Integrale - group B stylee.


Very very nice, but no seat belts?

Maybe that's why the interior is that colour?

Doesn't show the blood stains.


Was there ever a better looking cheap family car than the MkI Escort.


Yes I know they're an arm & a leg now, but that really is a good looking car.


Here's a puzzler, what's this ^^ I've never seen one before.


It appears to be a coachbuilt MGB.

I couldn't understand why someone would do that, until I searched the coach builder's name.

There was a badge on the side.........


..... which reads "Jacques Coune - carrossier"

I turns out he was a Belgian who employed a lot of Italian panel beaters & sold 54 of these MGB Berlinettas before BMC bought out the BGT. That punch a bit of a hole in the market as his offering was £1300 & a new BGT was less than £700. Apparently BMC looked at productionising this design, but decided it looked "too Italian" which is a little odd bearing in mind how many Farina designs they used.


Almost as obscure, an Austin Atlantic, look at those front & rear windows - I can just imagine the meeting - "those American Johnnies are putting highly curved screens in their cars, we can't be doing with investing in that sort of frippery, make a curved screen out of three pieces, no-one will notice the joins ........"


Another dull BMW ......


Aw - don't you just want to give it a cuddle (the car, not the old geezer)


I went to Surrey Street Rodders' "Wheels day" once. There were TEN of these, every last one painted like the General Lee from Dukes of Hazzard.

Strangely, I haven see one in that livery since that day.


Yes OK, this one's a Road Runner & the General Lee was a Charger, but you know what I'm saying ......


This couldn't get in because the fields were full - THIS! - they refused entry to THIS!!


With THOSE wheels on it!!!


Of course I always knew the original 500 wouldn't have much luggage space with the engine in the back.

What I didn't realise .......


..... is that there wasn't a lot of luggage space in the front either.


The other '50s kit.

I'm guessing that if this was a person it would NOT be a vegan?

Jus' sayin'


Now there's a car to waft along the Cote D'Azure (spelling?) in.


If you've broken down by the roadside, there's nothing more reassuring that a cat / dog skeleton ty-rapped to the tow-truck.

(It's just above the spare wheel.)


Come on then, let's have your guesses ........


No idea?


(Me neither)


Said "Healey" on it


Now there's a Statement Of Intent if ever there was one.


That's all folks, there are a few more photos, but frankly - I'm bored now & I need to go mend that throttle pedal return spring.